Just got your hands on a pair of sleek Bose headphones with Bluetooth capabilities? Awesome! Now, if you’re wondering how to seamlessly connect them to your Mac for a music or video session, worry not. It’s a breeze!
In this article, we’ll guide you through a set of simple steps to link your Bose headphones to your Mac. Plus, we’ll throw in troubleshooting tips in case your Mac seems a bit stubborn about recognizing your Bose headphones. No need to stress – we’ve got you covered. Enjoy your immersive audio experience with ease on your Mac!
HOW TO CONNECT BOSE HEADPHONES WITH YOUR MAC?
- Turn your Bose Headphones power on
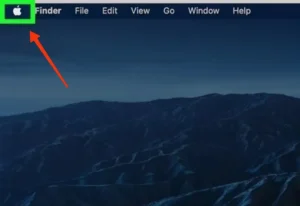
- Turn on your mac and then, Press the Apple icon in the menu that appears on your Mac, then chose System Preferences.

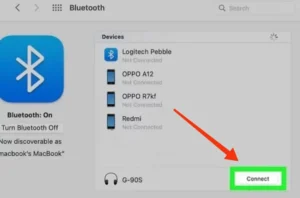
- Press the Bluetooth Icon
- If the status indicates Turn Bluetooth On, click it to activate Bluetooth on the computer. If the status indicates Switch Bluetooth Off, Bluetooth is already activated on the computer.

- Your Mac is going to automatically look for your Bose Bluetooth headphones. When it shows the bose device click on it. The headphones are now successfully linked to your Mac computer.
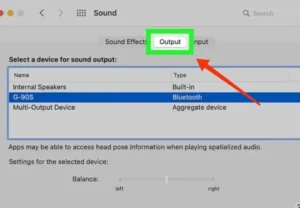
- Hit the back icon on the Bluetooth window then Tap Sound.

- Choose your preferred volume level after clicking your Bose headphones in the Output window.
Full Process Explain here: –
Connecting your Bose headphones to your Mac is a breeze, making it easy to enjoy your favorite tunes seamlessly. If you’re a proud owner of both a Mac and Bose headphones, you’re in for a treat. Follow these straightforward steps to ensure a smooth connection. No need to worry if you encounter any hiccups – we’ve got troubleshooting tips covered too. Now, you can elevate your audio experience effortlessly by syncing your Bose headphones with your Mac. Dive into the world of music without any hassle, and let the harmony between your Mac and Bose headphones enrich your listening pleasure.
Step 1: Turn on your Bose headphones
The first step to connecting your Bose headphones to your Mac is to ensure that they are turned on. To do this, simply press and hold the power button on your headphones until the LED light flashes. Once the LED light is flashing, your headphones are ready to be paired with your Mac.
Step 2: Put your Bose headphones in pairing mode
To connect your Bose headphones to your Mac, you’ll need to put them in pairing mode. To do this, press and hold the Bluetooth button on your headphones until you hear a tone or see the LED light flashing. This will indicate that your headphones are now in pairing mode.
Step 3: Turn on Bluetooth
Once your headphones are in pairing mode, you’ll need to turn on Bluetooth on your Mac. Press the Apple icon in the menu that appears on your Mac, then chose System Preferences. From there, click on “Bluetooth” and ensure that the toggle switch is in the “On” position.
Step 4: Find your Bose headphones in the list of available devices
With Bluetooth turned on, your Mac will automatically start scanning for available devices. Tap on your Bose headphones to start the pairing procedure when they show up in the list of compatible devices. If your headphones do not appear in the list, ensure that they are in pairing mode and try again.
Step 5: Pair your Bose headphones with your Mac
Once you’ve selected your Bose headphones from the list of available devices, your Mac will attempt to pair with them. You may be prompted to enter a passcode or to confirm the pairing process. To finish the pairing procedure, follow the on-screen directions.
Step 6: Test your headphones
Once your Bose headphones are connected to your Mac, you can test them by playing some music or a video. If you hear sound coming from your headphones, then they are connected correctly. If you don’t hear any sound, check your volume settings and ensure that your headphones are still connected to your Mac.
Conclusion
Connecting your Bose headphones to your Mac is a simple process that can be completed in just a few steps. By following these steps, you can enjoy your favorite music or videos without disturbing those around you. Whether you’re at home, in the office, or on the go, your Bose headphones can provide you with a high-quality audio experience that will enhance your listening pleasure.
FAQs
Q: What if my Bose headphones do not appear in the list of available devices on my Mac?
A: If your Bose headphones do not appear in the list of available devices, ensure that they are turned on and in pairing mode. If they still do not appear, try resetting your headphones by holding down the power button for 10 seconds, and then try the pairing process again.
Q: How do I know if my Bose headphones are connected to my Mac?
A: When your Bose headphones are connected to your Mac, you should hear a tone or see a notification on your Mac confirming the connection. You can also check your sound settings on your Mac to ensure that your headphones are selected as the output device.
Q: Can I connect my Bose headphones to multiple devices simultaneously?
A: Some Bose headphones allow for multi-point pairing, which means they can be connected to two devices at the same time. However, not all Bose headphones support this feature, so check the user manual for your specific model to confirm.
Q: What if I am having trouble with the audio quality or connectivity of my Bose headphones?
A: If you are experiencing issues with the audio quality or connectivity of your Bose headphones, try resetting them by holding down the power button for 10 seconds. You can also try updating the firmware of your headphones using the Bose Connect app or by visiting the Bose website.
Q: Can I use my Bose headphones to make phone calls on my Mac?
A: Yes, if your Bose headphones have a built-in microphone, you can use them to make phone calls on your Mac. Simply select your headphones as the input and output device in your sound settings and start making calls.